[wordpress插件] Bootstrap for Contact Form 7联络表格7的自举

wordpress 插件 文章 2020-03-09 11:50 1320 0 全屏看文

AI助手支持GPT4.0

评分
96
描述

Bootstrap for Contact Form 7 modifies all the output of the popular Contact Form 7 plugin to be fully compatible

Bootstrap for Contact Form 7修改了流行的 Contact Form 7插件的所有输出,以使其完全兼容

with the current version 3 of the popular CSS framework Bootstrap.

使用流行的CSS框架的当前版本3 Bootstrap

What this means to you as a Bootstrap user: No additional CSS rules necessary – from now on, Contact Form 7 integrates seamlessly with the overall Bootstrap design.

作为Bootstrap用户,这对您意味着什么:无需其他CSS规则–从现在开始,Contact Form 7与整个Bootstrap设计无缝集成。

It is even possible to use different form layouts via Contact Form 7’s “Additional Settings” tab.

甚至可以通过Contact Form 7的“其他设置”标签使用不同的表单布局。

This plugin is an addon to Contact Form 7.
  

此插件是联系表格7的附加组件。
  

The plugin requires Contact Form 7 to be activated, otherwise it won’t change anything.

该插件需要激活Contact Form 7,否则它将保持不变。

Furthermore you should be using it in conjunction with a Bootstrap-based WordPress theme, otherwise the forms might look weird (and there would be no point in using this addon anyway).

此外,您应该将其与基于Bootstrap的WordPress主题结合使用,否则表单看起来可能很奇怪(无论如何,使用此插件毫无意义)。

Usage

用法

Bootstrap for Contact Form 7 does not provide additional options itself, so you can continue using Contact Form 7 (almost) the same way you did before.

联系表7的Bootstrap本身并不提供其他选项,因此您可以(几乎)以与以前相同的方式继续使用联系表7。

The plugin will not break your form’s appearance, however it is recommended to adjust the contact form shortcodes to achieve perfect results: Generally, you should not be using HTML tags any longer to wrap the field shortcodes.

该插件不会破坏您表单的外观,但是建议您调整联系表单的简码以达到理想的效果:通常,您不应再使用HTML标记来包装字段简码。

They already include the complete Bootstrap-ready markup, including displaying labels.

它们已经包括完整的Bootstrap就绪标记,包括显示标签。

Read the Setup Guide for a quick introduction.

阅读设置指南以进行快速介绍。

Advanced Features

高级功能

The plugin brings some additional useful features to enhance your forms even more:

该插件带来了一些附加的有用功能,以进一步增强您的表单:

    • the form layout can be changed to a horizontal or inline one
    • 表单布局可以更改为水平或嵌入式

    • the form’s input size can be globally changed
    • 表单的输入大小可以全局更改

    • checkbox and radio groups can be displayed either one per line, inline or as Bootstrap buttons
    • 复选框和广播组可以每行,内联或作为Bootstrap按钮显示一次

    • text inputs and textareas support Bootstrap’s input group feature to add content before or after them
    • 文本输入和文本区域支持Bootstrap的输入组功能,可在它们之前或之后添加内容

    • text inputs and textareas can show a character count (the [count] shortcode from Contact Form 7) inline
    • 文本输入和文本区域可以内联显示字符计数(联系表格7中的[count]短代码)

    • the captcha input field can show the captcha image inline
    • 验证码输入字段可以内嵌显示验证码图像

    • by using GET parameters in a URL to a contact form, field values can be predefined
    • 通过使用联系表URL中的GET参数,可以预定义字段值

    The above features are explained in detail on the Other Notes page.<

    其他说明页面上详细说明了上述功能。<

    /p>

    / p>

    Basic Idea behind the Plugin

    插件背后的基本思想

    Lots of WordPress Themes are based on Bootstrap – and while it is the general approach to use CSS rules to style your HTML content, it is also possible the other way around – with many benefits.

    很多WordPress主题都是基于Bootstrap的,虽然它是使用CSS规则来样式化HTML内容的通用方法,但反过来也有可能-具有很多好处。

    When using a well-known framework which provides general styles for all the important components of a website, it can be time-consuming to apply the same styles to third-party plugins which (obviously) have not been written with a framework

    使用众所周知的框架为网站的所有重要组件提供通用样式时,将相同的样式应用于(显然)未使用框架编写的第三方插件可能会非常耗时

    in mind.

    心里。

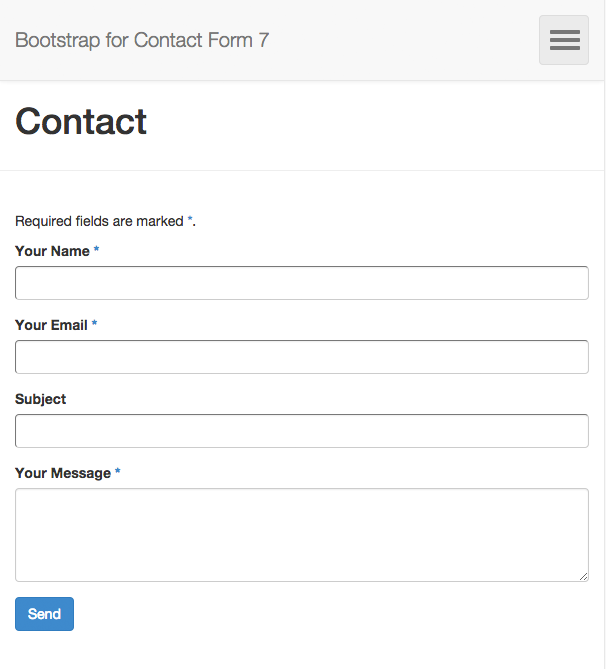
    This is perfectly fine, but if you’re using Bootstrap for your WordPress theme, you will certainly love the fact that you do not need to write CSS rules for the Contact Form 7 plugin any longer.

    很好,但是如果您将Bootstrap用于WordPress主题,那么您一定会喜欢这样的事实,即您不再需要为Contact Form 7插件编写CSS规则。

    It will all look like Bootstrap from the beginning so that it fits into your website design.

    从一开始它就看起来像Bootstrap,因此适合您的网站设计。

    If you’re not using Bootstrap, this plugin is useless for you – but maybe you’re just having an idea how you can adjust another popular WordPress plugin to integrate with another well-written CSS framework.

    如果您不使用Bootstrap,则此插件对您毫无用处-但也许您只是想知道如何调整另一个流行的WordPress插件以与另一个编写良好的CSS框架集成。

    Advanced Features

    高级功能

    Additional Settings

    其他设置

    Here you find additional settings which are part of the Bootstrap for Contact Form 7 plugin.

    在这里您可以找到其他设置,这些设置是Bootstrap for Contact Form 7插件的一部分。

    If you want to learn more about the additional settings of the original Contact Form 7 plugin, please visit this page

    如果您想了解有关原始Contact Form 7插件的其他设置的更多信息,请访问此页面

    .

    You can adjust several form properties (properties that affect an entire form, not just a single field of it) to give your forms the appearance you want.

    您可以调整几个表单属性(影响整个表单的属性,而不仅仅是单个表单域),以使表单具有所需的外观。

    Here is a list of the properties, what they do and their possible values:

    这是属性的列表,它们的作用及其可能的值:

      • layout – adjusts the form’s layout (note that in most cases the inline form will need additional styling to look good);

      • layout –调整表单的布局(请注意,在大多数情况下,内联表单将需要其他样式才能看起来不错);

        valid values: ‘default’, ‘inline’, ‘horizontal’;

        有效值:“默认”,“内联”,“水平”;

        default value: ‘default’

      • 默认值:“默认”

      • size – adjusts the size of all input fields;

      • size –调整所有输入字段的大小;

        valid values: ‘default’, ‘small’, ‘large’;

        有效值:“默认”,“小”,“大”;

        default value: ‘default’

      • 默认值:“默认”

      • group_layout – adjusts the layout of checkbox and radio groups;

      • group_layout –调整复选框和单选组的布局;

        valid values: ‘default’, ‘inline’, ‘buttons’;

        有效值:“默认”,“内联”,“按钮”;

        default value: ‘default’

      • 默认值:“默认”

      • group_type – adjusts the color of checkbox and radio groups with buttons layout;

      • group_type –使用按钮布局调整复选框和单选组的颜色;

        valid values: ‘default’, ‘primary’, ‘success’, ‘info’, ‘warning’, ‘danger’;

        有效值:“默认”,“主要”,“成功”,“信息”,“警告”,“危险”;

        default value: ‘default’

      • 默认值:“默认”

      • submit_size – adjusts the size of the submit button;

      • submit_size –调整提交按钮的大小;

        valid values: ‘default’, ‘small’, ‘large’ or an empty string to force it to have the size defined in the size form property;

        有效值:“默认”,“小”,“大”或一个空字符串,以强制其具有在 size 表单属性中定义的大小;

        default value is an empty string

      • 默认值为空字符串

      • submit_type – adjusts the color of the submit button;

      • submit_type –调整提交按钮的颜色;

        valid values: ‘default’, ‘primary’, ‘success’, ‘info’, ‘warning’, ‘danger’;

        有效值:“默认”,“主要”,“成功”,“信息”,“警告”,“危险”;

        default value: ‘primary’

      • 默认值:“主要”

      • required_html – adjusts the HTML output to append to required fields’ labels;

      • required_html –调整HTML输出以附加到必填字段的标签;

        valid values: any HTML output;

        有效值:任何HTML输出;

        default value: *

      • 默认值: *

      • grid_columns – allows you to override the total grid column count of Bootstrap (you might only need to adjust this if you’re using a custom version of Bootstrap);

      • grid_columns –允许您覆盖Bootstrap的总网格列数(如果您使用的是Bootstrap的自定义版本,则可能只需要对此进行调整);

        valid values: any integer greater than 1;

        有效值:任何大于1的整数;

        default value: 12

      • 默认值:12

      • label_width – adjusts the form’s label width (applies only to horizontal layout);

      • label_width –调整表单的标签宽度(仅适用于水平布局);

        valid values: any integer between 1 and the value of grid_columns minus 1;

        有效值:1到 grid_columns 的值减1之间的任何整数;

        default value: 3

      • 默认值:3

      • breakpoint – adjusts the responsive breakpoint (applies only to horizontal layout);

      • 断点 –调整响应断点(仅适用于水平布局);

        valid values: ‘xs’, ‘sm’, ‘md’, ‘lg’;

        有效值:“ xs”,“ sm”,“ md”,“ lg”;

        default value: ‘sm’

      • 默认值:“ sm”

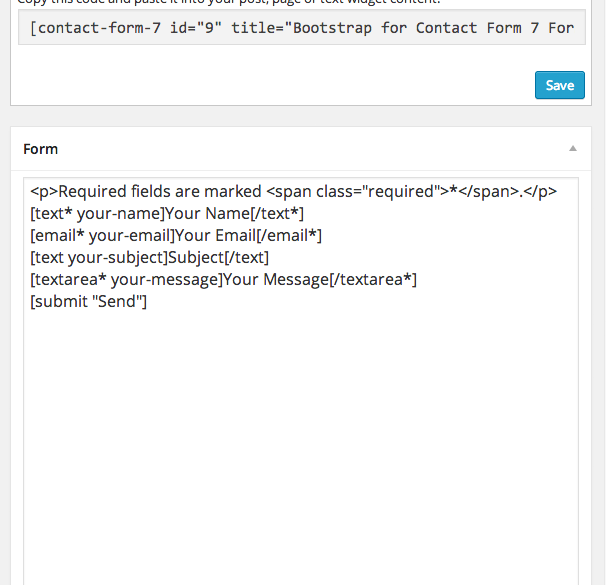
      There are four methods to adjust the above properties: The easiest one is to use the “Additional Settings” tab when editing a form in Contact Form 7 and insert any property and its desired value there, one per line.

      有四种方法可以调整上述属性:最简单的一种方法是在Contact Form 7中编辑表单时使用“其他设置”选项卡,然后在其中插入任何属性及其所需的值,每行一个。

      For example:

      例如:

      layout:horizontal

       布局:水平

      size:large

      尺寸:大

      group_layout:inline

      group_layout:inline

      Alternatively you can use the filter cf7bs_form_{{FORM_ID}}_properties where {{FORM_ID}} must be replaced by the ID of the form you would like to modify

      或者,您可以使用过滤器 cf7bs_form _ {{FORM_ID}} _ properties ,其中 {{FORM_ID}} 必须替换为您要修改的表单的ID

      (you find that number in the overall form's shortcode).

      (您可以在整体表单的简码中找到该数字)。

      An array of all the properties and their values is passed to that function so that you can easily adjust them.

      所有属性及其值的数组将传递给该函数,以便您可以轻松调整它们。

      Example (in this case we would adjust the contact form with the ID 3):

      示例(在这种情况下,我们将调整ID为3的联系表格):

      function my_custom_form_properties( $properties ) {    

        function my_custom_form_properties($ properties){    

      $properties['layout'] = 'horizontal';    

      $ properties ['layout'] ='水平';    

      $properties['size'] = 'large';    

      $ properties ['size'] ='大';    

      $properties['group_layout'] = 'inline';    

      $ properties ['group_layout'] ='内联';    

      return $properties;

      返回$ properties;

      }

      }

      add_filter( 'cf7bs_form_3_properties', 'my_custom_form_properties' );

      add_filter('cf7bs_form_3_properties','my_custom_form_properties');

      The third way does something slightly different from the other two since it does not change a specific form’s properties, but the default properties for all forms.

      第三种方法与其他两种方法有所不同,因为它不会更改特定表单的属性,而是所有表单的默认属性。

      To do that, you should use the filter cf7bs_default_form_properties which works exactly like the other filter mentioned above.

      为此,您应该使用过滤器 cf7bs_default_form_properties ,该过滤器的工作原理与上述其他过滤器完全相同。

      The fourth method is different from the others as it allows to override the form settings on a per-field basis.

      第四种方法与其他方法不同,因为它允许逐字段覆盖表单设置。

      You can add any of the setting names plus its intended value as a shortcode attribute for any field to make this field behave differently from the form’s setting.

      您可以将任何设置名称及其预期值添加为任何字段的shortcode属性,以使该字段的行为不同于表单的设置。

      This can be especially helpful if you need to create advanced form layouts like when you need multiple fields on the same line.

      如果您需要创建高级表单布局(例如在同一行上需要多个字段时),这将特别有用。

      For example, you could do the following to display two fields in one row, even though the form’s layout is set to ‘default’:

      例如,即使表单的 layout 设置为“默认”,您也可以执行以下操作以在一行中显示两个字段:


      [text user_first_name id:user-first-name layout:none][/text]

      [text user_last_name id:user-last-name layout:none][/text]

      Note that the custom form filter takes precedence over the properties defined in the admin, while the default filter is just used as fallback.

      请注意,自定义表单过滤器优先于admin中定义的属性,而默认过滤器仅用作备用。

      Input Groups

      输入组

      All textual input fields support the input group feature that Bootstrap provides.

      所有文本输入字段均支持Bootstrap提供的输入组功能。

      To use it, add a shortcode-like construct (almost, but it has to use curly braces instead) into the content of any text / email / url / tel input shortcode.

      要使用它,请在任何文本/电子邮件/ URL /电话输入简码的内容中添加类似短码的构造(几乎,但是必须使用花括号)。

      Example:

      示例:

      [text twitter-username]{input_before}@{/input_before}Your Twitter Handle[/text]

        [文本twitter-username] {input_before} @ {/ input_before}您的Twitter句柄[/ text]

      Note that the input_before and input_after can also be added to textareas.

      请注意,也可以将 input_before input_after 添加到文本区域。

      In this case, the content will be displayed directly above or below the textarea respectively.

      在这种情况下,内容将分别直接显示在文本区域的上方或下方。

      Submit Button Alignment

      提交按钮对齐

      The submit button can be aligned left, center or right to fit your form’s desired appearance.

      “提交”按钮可以左,中或右对齐,以适合表单所需的外观。

      Simply provide an align option with either ‘left’, ‘center’ or ‘right’ as value.

      只需提供 align 选项,将“ left”,“ center”或“ right”作为值即可。

      Example:

      示例:

      [submit align:right "Send"]

        [submit align:right“ Send”]

      Inline Character Count

      内联字符数

      Contact Form 7 provides a [count] shortcode that renders a number indicating how many characters have been entered or how many characters are remaining in a specific input field.

      联系表7提供了一个 [count] 简码,该简码呈现一个数字,该数字指示已输入多少个字符或特定输入字段中剩余多少个字符。

      Using it on its own looks kind of ugly though.

      单独使用它看起来很丑。

      But guess what, you can adjust that too by adding an option include_count to any text / email / url / tel / textarea input.

      但是,您可以猜测一下,您也可以通过在任意文本/电子邮件/ URL /电话/文本区域输入中添加选项 include_count 来进行调整。

      You can optionally specify a value for that option as well which can consist of the positioning (‘before’ or ‘after’) and the count direction (‘up’ or ‘down’) of the counter.

      您还可以为该选项指定一个值,该值可以由计数器的位置(“之前”或“之后”)和计数方向(“向上”或“向下”)组成。

      Just as a reminder, when choosing ‘down’, make sure you give the input element a maximum length, otherwise there is no point in having that counter.

      提醒一下,在选择“向下”时,请确保为输入元素提供最大长度,否则使用该计数器毫无意义。

      Example:

      示例:

      [text your-text maxlength:80 include_count:after:down]Your Text[/text]

        [文本您的文本最大长度:80 include_count:after:down]您的文本[/ text]

      By the way, have you read the information about input groups above?

      顺便问一下,您是否已阅读上述有关输入组的信息?

      You can combine those with the character count (because just seeing a number without any additional information might confuse your site’s visitors).

      您可以将其与字符数结合使用(因为仅看到一个数字而没有任何其他信息可能会使您的网站访问者感到困惑)。

      The following example will show a message like ‘433 characters left’ after the field:

      以下示例将在该字段后显示一条类似于“剩余433个字符”的消息:

      [textarea your-text maxlength:500 include_count:after:down input_after:characters---left]Your Text[/textarea]

        [textarea您的文本最大长度:500 include_count:after:down input_after:characters --- left]您的文本[/ textarea]

      Inline Captcha Image

      内嵌验证码图片

      If you've been using Contact Form 7 together with the Really Simple CAPTCHA plugin, you are probably

      如果您将联系表7与真正简单的验证码插件一起使用,则可能是

      aware of the [captchar] (captcha input field) and [captchac] (captcha image) shortcodes it provides.

      知道它提供的 [captchar] (验证码输入字段)和 [captchac] (验证码图片)简码。

      You can still use them independently, but it probably looks nicer to have the captcha image show up inline, right beside its input field.

      您仍然可以单独使用它们,但是使验证码图像在线显示在其输入字段旁边可能看起来更好。

      To accomplish this, remove the [captchac] shortcode completely and instead add a new option include_captchac to the [captchar] shortcode.

      为此,请完全删除 [captchac] 简码,然后在 [captchar] 简码中添加新选项 include_captchac

      You can optionally give this option a value (either ‘before’ or ‘after’) to mark the location where the image should show up.

      您可以选择为此选项提供一个值(“之前”或“之后”),以标记应显示图像的位置。

      Example:

      示例:

      [captchar your-captcha include_captchac:before]Captcha[/captchar]

        [验证码您的验证码include_captchac:before]验证码[/ captchar]

      Custom Form URLs

      自定义表单网址

      You can add GET parameters to populate your forms with custom initial values by simply using the field name as parameter’s key and the desired value as the parameter’s value.

      您可以添加GET参数,只需使用字段名称作为参数的键并将所需的值用作参数的值,即可使用自定义的初始值填充表单。

      This works with checkboxes, date fields, number fields, select fields, all text fields and textareas.

      这适用于复选框,日期字段,数字字段,选择字段,所有文本字段和文本区域。

      The easiest way to create such a URL is to use the plugin's function cf7bs_add_get_parameter() where you provide parameters similarly to the WordPress Core function add_query_arg.

      / add_query_arg“ rel =” nofollow“> add_query_arg 。

      Example:

      示例:

      $my_custom_url = cf7bs_add_get_parameter( array(    

        $ my_custom_url = cf7bs_add_get_parameter(array(    

      'your-name' => 'John Doe',    

      '您的名字'=>'约翰·杜伊',    

      'your-email' => 'johndoe@example.com',    

      '您的电子邮件'=>'johndoe@example.com',    

      'your-subject' => 'Support Request',

      '您的主题'=>'支持请求',

      ), 'http://www.example.com/my-custom-form/' );

      ),'http://www.example.com/my-custom-form/');

      Filter Field Arguments

      过滤字段参数

      As of version 1.2.3, field arguments for every single field can be filtered, which allows you to basically modify anything you like.

      从1.2.3版开始,可以过滤每个字段的字段参数,这使您基本上可以修改所需的任何内容。

      The filters you need to hook your function into have the following structure cf7bs_form_{{FORM_ID}}_field_{{FIELD_BASETYPE}}_{{FIELD_NAME}}_properties.

      您需要将函数挂接到的过滤器具有以下结构 cf7bs_form _ {{FORM_ID}} _ field _ {{FIELD_BASETYPE}} _ {{FIELD_NAME}} _ properties

      Yep, it’s a long filter name, but it is necessary so that you can filter in the most detailed way possible.

      是的,它是一个很长的过滤器名称,但是它是必需的,以便您可以以最详细的方式进行过滤。

      When using one of the filters, replace {{FORM_ID}} with the ID of the form, {{FIELD_BASETYPE}} with the type of the field you need to adjust (

      使用其中一种过滤器时,将 {{FORM_ID}} 替换为表单ID,将 {{FIELD_BASETYPE}} 替换为您需要调整的字段类型(

      be sure to not include the asterisks here!) and {{FIELD_NAME}} with the name of the field.

      请确保不要在此处添加星号!)和 {{FIELD_NAME}} 字段名称。

      The function should accept one argument, an array of parameters.

      该函数应接受一个参数,即参数数组。

      For an overview about the available parameters, please check the plugin’s source code.

      有关可用参数的概述,请检查插件的源代码。

      Unsupported functionality

      不受支持的功能

      While the plugin tries to support as many features as possible from the original Contact Form 7 (in combination with adding new ones!), not everything is and can be supported.

      尽管该插件尝试从原始的Contact Form 7中支持尽可能多的功能(结合添加新功能!),但并非所有功能都可以支持。

      There are two things in particular which are explicitly not supported:

      特别有两件事明确不被支持:

        • the size option on all input fields (Bootstrap form elements scale automatically, so we do not need a custom size for those)
        • 所有输入字段上的 size 选项(Bootstrap表单元素会自动缩放,因此我们不需要为其自定义大小)

        • the label_first option on checkbox and radio fields (Bootstrap natively only supports checkboxes and radio buttons where the label is displayed after them)
        • 复选框和单选字段的 label_first 选项(Bootstrap本机仅支持复选框和单选按钮,在其后显示标签)

        If you discover any other Contact Form 7 feature than the above two which is not supported by Bootstrap for Contact Form 7, you can raise an issue or submit a

        form-7 / issues“ rel =” nofollow“>引发问题提交一个

        support request.

        支持请求。

安装步骤

Download and Activation

下载和激活

    1. Either download the plugin from within your WordPress site, or download it manually and then upload the entire bootstrap-for-contact-form-7 folder to the /wp-content/plugins

    2. 从您的WordPress网站中下载插件,或者手动下载插件,然后将整个 bootstrap-for-contact-form-7 文件夹上载到 / wp-content / plugins

      / directory.

    3. / 目录。

    4. Activate the plugin through the ‘Plugins’ menu in WordPress.
    5. 通过WordPress中的“插件”菜单激活插件。

    Setup Guide

    设置指南

    While the shortcodes generally work the same like in the original plugin, there are a few things to consider.

    虽然短代码的工作原理通常与原始插件相同,但仍需要考虑一些事项。

    If you like to get started quickly, just copy/paste the content below and adjust it to get the form you like (the code below recreates the default form from Contact Form 7).

    如果您想快速入门,只需复制/粘贴下面的内容,然后进行调整以获取所需的表单(下面的代码从Contact Form 7重新创建默认表单)。

    [text* your-name]Your Name[/text*]

      [text *您的名字]您的名字[/ text *]

    [email* your-email]Your Email[/email*]

    [email *您的电子邮件]您的电子邮件[/ email *]

    [text your-subject]Subject[/text]

    [给您的主题发短信]主题[/ text]

    [textarea your-message]Your Message[/textarea]

    [textarea your-message]您的留言[/ textarea]

    [submit "Send"]

    [提交“发送”]

    The following are the most important things that are different in Bootstrap for Contact Form 7:

    以下是与Bootstrap for Contact Form 7不同的最重要的事情:

      1. Field labels are now integrated in the field shortcodes, so you don’t need to wrap them in paragraphs when editing the form.

      2. 字段标签现已集成到字段简码中,因此您在编辑表单时无需将其包装在段落中。

        Instead, make the field shortcode enclosing and put the label text between the opening and closing tag.

        而是将字段短代码括起来,并将标签文本放在开始和结束标签之间。

        Example: [text* your-name]Your Name[/text*]

      3. 例如: [text * your-name]您的姓名[/ text *]

      4. You don’t need to use HTML tags any longer to give your form a layout.

      5. 您不再需要使用HTML标签来为表单提供布局。

        The field shortcodes handle this manually, so you should remove all HTML tags from the form editor.

        字段简码是手动处理的,因此您应该从表单编辑器中删除所有HTML标记。

        Of course you can still use HTML code to separate parts of your form, for example using the

        tag.
      6. 当然,您仍然可以使用HTML代码来分隔表单的各个部分,例如使用

        标记。

      It is recommended to adjust the shortcodes to be conform with the explainations above to ensure perfect results with the plugin and Boostrap themes.

      建议调整短代码以使其与上述说明一致,以确保插件和Boostrap主题具有完美的效果。

      For details on everything else that you can do to enhance your forms even further, feel free to check out the Other Notes section.

      other_notes /“>其他注释部分。

下载地址
https://downloads.wordpress.org/plugin/bootstrap-for-contact-form-7.1.4.8.zip
-EOF-

AI助手支持GPT4.0