AI助手支持GPT4.0
Ever wished you could add custom pages to the BuddyPress profile menu?
是否希望您可以将自定义页面添加到BuddyPress配置文件菜单?
Here’s a plugin for that.
这是一个插件。
Simply install and activate the plugin, add your custom menu page(s).
只需安装并激活插件,然后添加您的自定义菜单页面即可。
That’s it, Bingo!
就是这样,宾果!
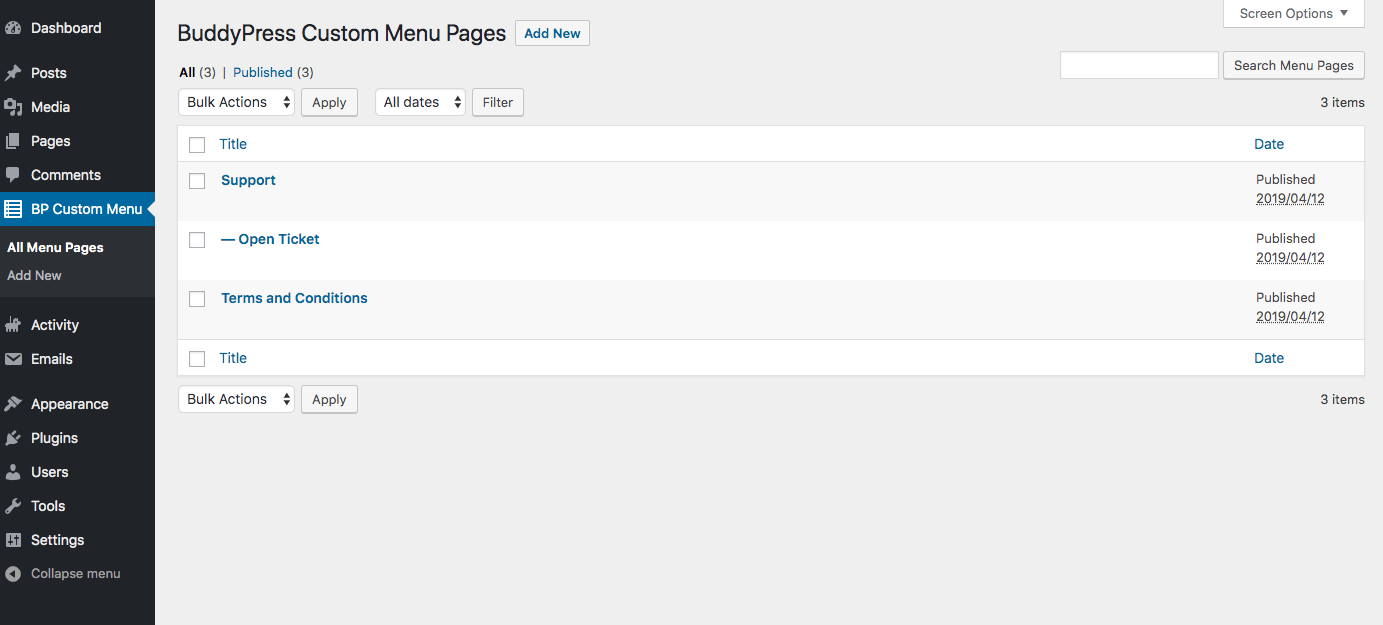
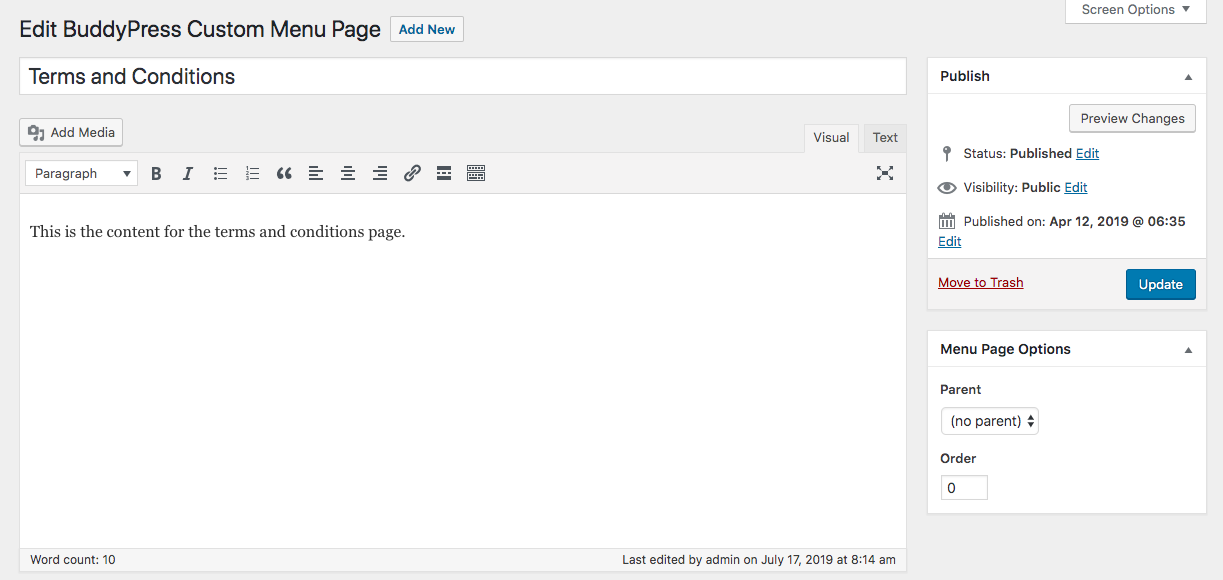
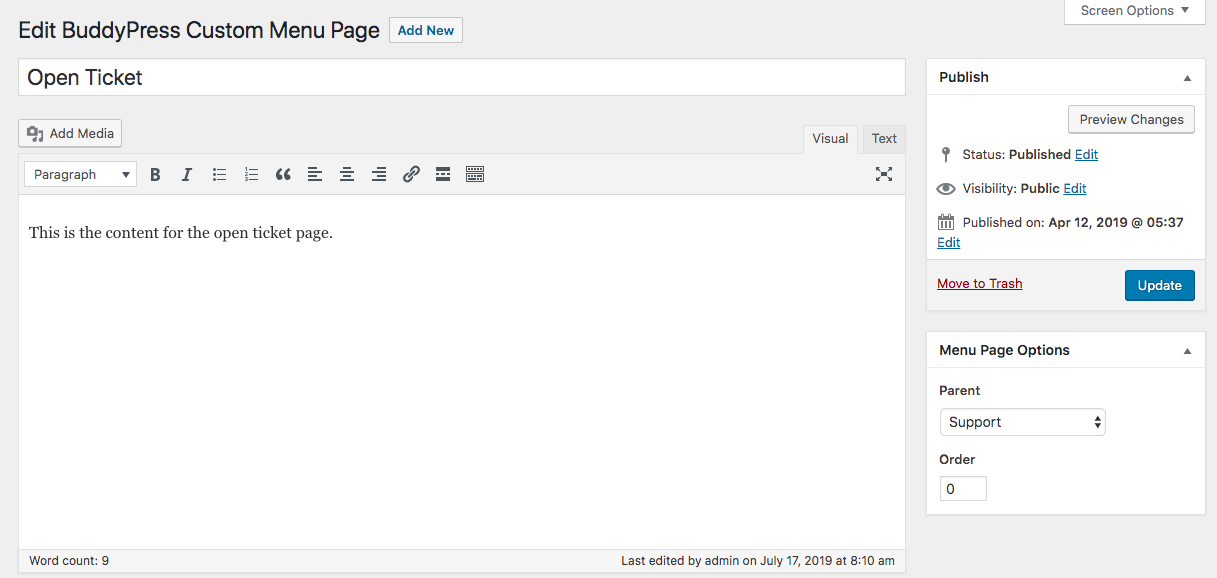
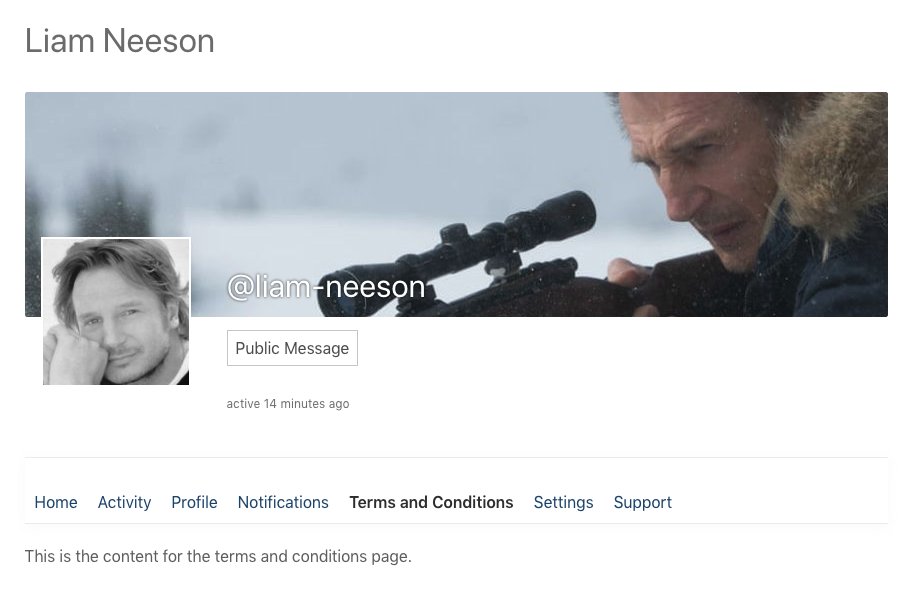
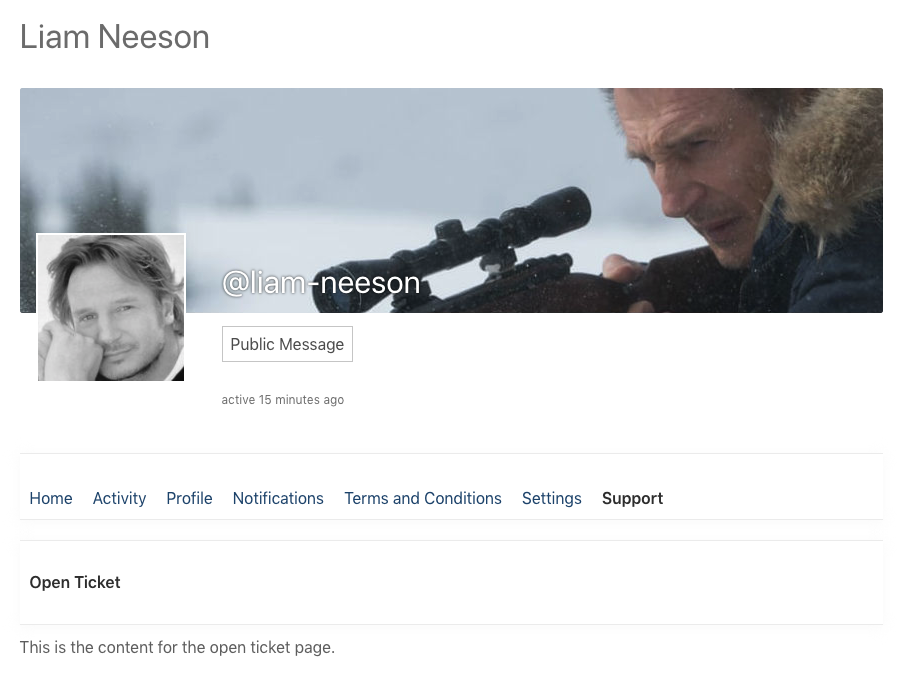
The Custom Profile Menu for BuddyPress plugin lets you add custom static pages to the BuddyPress profile menu.
通过 BuddyPress的自定义配置文件菜单插件,您可以将自定义的静态页面添加到BuddyPress的配置文件菜单。Extend the extremely limited BuddyPress profile menu by adding your desired number of custom pages to it, with your desired content along with the built-in Home, Activity, Profile通过向其中添加所需数量的自定义页面,所需的内容以及内置的 Home , Activity , Profile来扩展极其有限的BuddyPress配置文件菜单, Notifications, and Settings items.,通知和设置项目。Use Cases用例The major use case of this plugin would be adding custom sections to the BuddyPress profile, e.g.此插件的主要用例是将自定义部分添加到BuddyPress配置文件中,例如a terms & conditions page or static pages with shortcodes for forms, appointment bookings, WooCommerce products, and other infinite possibilities.条款和条件页面或带有表单,约会预订,WooCommerce产品和其他无限可能性的短代码的静态页面。Core Features核心功能The core features of the plugin include the abilities to:插件的核心功能包括:* Add custom static pages to the BuddyPress profile menu*将自定义静态页面添加到BuddyPress配置文件菜单* Add submenu pages by assigning a parent menu page*通过分配父菜单页面来添加子菜单页面* Set a default submenu page for a parent submenu page*为父子菜单页面设置默认子菜单页面* Re-order the menu items.*重新排序菜单项。Installation安装Installation of the Custom Profile Menu for BuddyPress plugin is very simple.安装 BuddyPress的自定义配置文件菜单非常简单。Follow along with the installation procedure in the dedicated Installation tab.按照专用的 安装标签中的安装过程进行操作。Usage用法Install and activate the plugin 安装并激活插件Go to your WordPress Dashboard→BP Custom Menu转到您的 WordPress信息中心→BP自定义菜单 Add a new page, enter your content, and publish.添加新页面,输入内容,然后发布。It will automatically show up as a menu item in the BuddyPress profile.它将自动显示为BuddyPress配置文件中的菜单项。In order to create a submenu page, please specify a “Parent” under the “Menu Page Options” in the right sidebar of要创建子菜单页面,请在“菜单页面选项” 下方的“父项” 中指定the edit screen.编辑屏幕。In order to specify a default submenu for a parent page, select a submenu page in the “Set Default Submenu” selection under the “Menu Page Options要为父页面指定默认子菜单,请在“菜单页面选项”下的“设置默认子菜单” 选择中选择一个子菜单页面” in the right sidebar of the edit screen.” 。In order to re-order the menu items, enter an index in the “Order” field under the “Menu Page Options” in the right sidebar of the edit要重新排序菜单项,请在修改右侧栏中“菜单页面选项” 下的“订购” 字段中输入索引screen.屏幕。A higher index means a higher level in the menu.较高的索引意味着菜单中的较高级别。Support支持If the above usage steps don't answer your question(s), if you want to report an issue or if something is not working as expected, please create a topic in the Support Forum..org / support / plugin / bp-custom-menu /“>支持论坛。Contribute贡献If you want to contribute to the plugin by reporting issues, implementing new features and so on, 如果您想通过报告问题,实现新功能等为插件做出贡献,请>here's its development repository on Github.>这是它在Github上的开发库。Sponsor赞助人You can sponsor this project and support my open-source development by becoming a Patron!您可以赞助该项目并通过成为赞助人来支持我的开源开发!! >>
Extend the extremely limited BuddyPress profile menu by adding your desired number of custom pages to it, with your desired content along with the built-in Home, Activity, Profile通过向其中添加所需数量的自定义页面,所需的内容以及内置的 Home , Activity , Profile来扩展极其有限的BuddyPress配置文件菜单, Notifications, and Settings items.,通知和设置项目。Use Cases用例The major use case of this plugin would be adding custom sections to the BuddyPress profile, e.g.此插件的主要用例是将自定义部分添加到BuddyPress配置文件中,例如a terms & conditions page or static pages with shortcodes for forms, appointment bookings, WooCommerce products, and other infinite possibilities.条款和条件页面或带有表单,约会预订,WooCommerce产品和其他无限可能性的短代码的静态页面。Core Features核心功能The core features of the plugin include the abilities to:插件的核心功能包括:* Add custom static pages to the BuddyPress profile menu*将自定义静态页面添加到BuddyPress配置文件菜单* Add submenu pages by assigning a parent menu page*通过分配父菜单页面来添加子菜单页面* Set a default submenu page for a parent submenu page*为父子菜单页面设置默认子菜单页面* Re-order the menu items.*重新排序菜单项。Installation安装Installation of the Custom Profile Menu for BuddyPress plugin is very simple.安装 BuddyPress的自定义配置文件菜单非常简单。Follow along with the installation procedure in the dedicated Installation tab.按照专用的 安装标签中的安装过程进行操作。Usage用法Install and activate the plugin 安装并激活插件Go to your WordPress Dashboard→BP Custom Menu转到您的 WordPress信息中心→BP自定义菜单 Add a new page, enter your content, and publish.添加新页面,输入内容,然后发布。It will automatically show up as a menu item in the BuddyPress profile.它将自动显示为BuddyPress配置文件中的菜单项。In order to create a submenu page, please specify a “Parent” under the “Menu Page Options” in the right sidebar of要创建子菜单页面,请在“菜单页面选项” 下方的“父项” 中指定the edit screen.编辑屏幕。In order to specify a default submenu for a parent page, select a submenu page in the “Set Default Submenu” selection under the “Menu Page Options要为父页面指定默认子菜单,请在“菜单页面选项”下的“设置默认子菜单” 选择中选择一个子菜单页面” in the right sidebar of the edit screen.” 。In order to re-order the menu items, enter an index in the “Order” field under the “Menu Page Options” in the right sidebar of the edit要重新排序菜单项,请在修改右侧栏中“菜单页面选项” 下的“订购” 字段中输入索引screen.屏幕。A higher index means a higher level in the menu.较高的索引意味着菜单中的较高级别。Support支持If the above usage steps don't answer your question(s), if you want to report an issue or if something is not working as expected, please create a topic in the Support Forum..org / support / plugin / bp-custom-menu /“>支持论坛。Contribute贡献If you want to contribute to the plugin by reporting issues, implementing new features and so on, 如果您想通过报告问题,实现新功能等为插件做出贡献,请>here's its development repository on Github.>这是它在Github上的开发库。Sponsor赞助人You can sponsor this project and support my open-source development by becoming a Patron!您可以赞助该项目并通过成为赞助人来支持我的开源开发!! >>
通过向其中添加所需数量的自定义页面,所需的内容以及内置的 Home , Activity , Profile来扩展极其有限的BuddyPress配置文件菜单, Notifications, and Settings items.
,通知和设置项目。Use Cases用例The major use case of this plugin would be adding custom sections to the BuddyPress profile, e.g.此插件的主要用例是将自定义部分添加到BuddyPress配置文件中,例如a terms & conditions page or static pages with shortcodes for forms, appointment bookings, WooCommerce products, and other infinite possibilities.条款和条件页面或带有表单,约会预订,WooCommerce产品和其他无限可能性的短代码的静态页面。Core Features核心功能The core features of the plugin include the abilities to:插件的核心功能包括:* Add custom static pages to the BuddyPress profile menu*将自定义静态页面添加到BuddyPress配置文件菜单* Add submenu pages by assigning a parent menu page*通过分配父菜单页面来添加子菜单页面* Set a default submenu page for a parent submenu page*为父子菜单页面设置默认子菜单页面* Re-order the menu items.*重新排序菜单项。Installation安装Installation of the Custom Profile Menu for BuddyPress plugin is very simple.安装 BuddyPress的自定义配置文件菜单非常简单。Follow along with the installation procedure in the dedicated Installation tab.按照专用的 安装标签中的安装过程进行操作。Usage用法Install and activate the plugin 安装并激活插件Go to your WordPress Dashboard→BP Custom Menu转到您的 WordPress信息中心→BP自定义菜单 Add a new page, enter your content, and publish.添加新页面,输入内容,然后发布。It will automatically show up as a menu item in the BuddyPress profile.它将自动显示为BuddyPress配置文件中的菜单项。In order to create a submenu page, please specify a “Parent” under the “Menu Page Options” in the right sidebar of要创建子菜单页面,请在“菜单页面选项” 下方的“父项” 中指定the edit screen.编辑屏幕。In order to specify a default submenu for a parent page, select a submenu page in the “Set Default Submenu” selection under the “Menu Page Options要为父页面指定默认子菜单,请在“菜单页面选项”下的“设置默认子菜单” 选择中选择一个子菜单页面” in the right sidebar of the edit screen.” 。In order to re-order the menu items, enter an index in the “Order” field under the “Menu Page Options” in the right sidebar of the edit要重新排序菜单项,请在修改右侧栏中“菜单页面选项” 下的“订购” 字段中输入索引screen.屏幕。A higher index means a higher level in the menu.较高的索引意味着菜单中的较高级别。Support支持If the above usage steps don't answer your question(s), if you want to report an issue or if something is not working as expected, please create a topic in the Support Forum..org / support / plugin / bp-custom-menu /“>支持论坛。Contribute贡献If you want to contribute to the plugin by reporting issues, implementing new features and so on, 如果您想通过报告问题,实现新功能等为插件做出贡献,请>here's its development repository on Github.>这是它在Github上的开发库。Sponsor赞助人You can sponsor this project and support my open-source development by becoming a Patron!您可以赞助该项目并通过成为赞助人来支持我的开源开发!! >>
The major use case of this plugin would be adding custom sections to the BuddyPress profile, e.g.
此插件的主要用例是将自定义部分添加到BuddyPress配置文件中,例如
a terms & conditions page or static pages with shortcodes for forms, appointment bookings, WooCommerce products, and other infinite possibilities.
条款和条件页面或带有表单,约会预订,WooCommerce产品和其他无限可能性的短代码的静态页面。Core Features核心功能The core features of the plugin include the abilities to:插件的核心功能包括:* Add custom static pages to the BuddyPress profile menu*将自定义静态页面添加到BuddyPress配置文件菜单* Add submenu pages by assigning a parent menu page*通过分配父菜单页面来添加子菜单页面* Set a default submenu page for a parent submenu page*为父子菜单页面设置默认子菜单页面* Re-order the menu items.*重新排序菜单项。Installation安装Installation of the Custom Profile Menu for BuddyPress plugin is very simple.安装 BuddyPress的自定义配置文件菜单非常简单。Follow along with the installation procedure in the dedicated Installation tab.按照专用的 安装标签中的安装过程进行操作。Usage用法Install and activate the plugin 安装并激活插件Go to your WordPress Dashboard→BP Custom Menu转到您的 WordPress信息中心→BP自定义菜单 Add a new page, enter your content, and publish.添加新页面,输入内容,然后发布。It will automatically show up as a menu item in the BuddyPress profile.它将自动显示为BuddyPress配置文件中的菜单项。In order to create a submenu page, please specify a “Parent” under the “Menu Page Options” in the right sidebar of要创建子菜单页面,请在“菜单页面选项” 下方的“父项” 中指定the edit screen.编辑屏幕。In order to specify a default submenu for a parent page, select a submenu page in the “Set Default Submenu” selection under the “Menu Page Options要为父页面指定默认子菜单,请在“菜单页面选项”下的“设置默认子菜单” 选择中选择一个子菜单页面” in the right sidebar of the edit screen.” 。In order to re-order the menu items, enter an index in the “Order” field under the “Menu Page Options” in the right sidebar of the edit要重新排序菜单项,请在修改右侧栏中“菜单页面选项” 下的“订购” 字段中输入索引screen.屏幕。A higher index means a higher level in the menu.较高的索引意味着菜单中的较高级别。Support支持If the above usage steps don't answer your question(s), if you want to report an issue or if something is not working as expected, please create a topic in the Support Forum..org / support / plugin / bp-custom-menu /“>支持论坛。Contribute贡献If you want to contribute to the plugin by reporting issues, implementing new features and so on, 如果您想通过报告问题,实现新功能等为插件做出贡献,请>here's its development repository on Github.>这是它在Github上的开发库。Sponsor赞助人You can sponsor this project and support my open-source development by becoming a Patron!您可以赞助该项目并通过成为赞助人来支持我的开源开发!! >>
The core features of the plugin include the abilities to:
插件的核心功能包括:
* Add custom static pages to the BuddyPress profile menu
*将自定义静态页面添加到BuddyPress配置文件菜单
* Add submenu pages by assigning a parent menu page
*通过分配父菜单页面来添加子菜单页面
* Set a default submenu page for a parent submenu page
*为父子菜单页面设置默认子菜单页面
* Re-order the menu items.
*重新排序菜单项。
Installation of the Custom Profile Menu for BuddyPress plugin is very simple.
安装 BuddyPress的自定义配置文件菜单非常简单。Follow along with the installation procedure in the dedicated Installation tab.按照专用的 安装标签中的安装过程进行操作。Usage用法Install and activate the plugin 安装并激活插件Go to your WordPress Dashboard→BP Custom Menu转到您的 WordPress信息中心→BP自定义菜单 Add a new page, enter your content, and publish.添加新页面,输入内容,然后发布。It will automatically show up as a menu item in the BuddyPress profile.它将自动显示为BuddyPress配置文件中的菜单项。In order to create a submenu page, please specify a “Parent” under the “Menu Page Options” in the right sidebar of要创建子菜单页面,请在“菜单页面选项” 下方的“父项” 中指定the edit screen.编辑屏幕。In order to specify a default submenu for a parent page, select a submenu page in the “Set Default Submenu” selection under the “Menu Page Options要为父页面指定默认子菜单,请在“菜单页面选项”下的“设置默认子菜单” 选择中选择一个子菜单页面” in the right sidebar of the edit screen.” 。In order to re-order the menu items, enter an index in the “Order” field under the “Menu Page Options” in the right sidebar of the edit要重新排序菜单项,请在修改右侧栏中“菜单页面选项” 下的“订购” 字段中输入索引screen.屏幕。A higher index means a higher level in the menu.较高的索引意味着菜单中的较高级别。Support支持If the above usage steps don't answer your question(s), if you want to report an issue or if something is not working as expected, please create a topic in the Support Forum..org / support / plugin / bp-custom-menu /“>支持论坛。Contribute贡献If you want to contribute to the plugin by reporting issues, implementing new features and so on, 如果您想通过报告问题,实现新功能等为插件做出贡献,请>here's its development repository on Github.>这是它在Github上的开发库。Sponsor赞助人You can sponsor this project and support my open-source development by becoming a Patron!您可以赞助该项目并通过成为赞助人来支持我的开源开发!! >>
Follow along with the installation procedure in the dedicated Installation tab.
按照专用的 安装标签中的安装过程进行操作。
It will automatically show up as a menu item in the BuddyPress profile.
它将自动显示为BuddyPress配置文件中的菜单项。
the edit screen.
编辑屏幕。
”
” 。
screen.
屏幕。
A higher index means a higher level in the menu.
较高的索引意味着菜单中的较高级别。
If the above usage steps don't answer your question(s), if you want to report an issue or if something is not working as expected, please create a topic in the Support Forum.
.org / support / plugin / bp-custom-menu /“>支持论坛。
If you want to contribute to the plugin by reporting issues, implementing new features and so on,
如果您想通过报告问题,实现新功能等为插件做出贡献,请
>here's its development repository on Github.
>这是它在Github上的开发库。
You can sponsor this project and support my open-source development by becoming a Patron!
您可以赞助该项目并通过成为赞助人来支持我的开源开发!!
>
This plugin requires the BuddyPress plugin to be installed and activated to work.
此插件需要安装 BuddyPress插件并激活才能正常工作。
原文出处:http://www.sanshu.cn/a/5350.html
群主管理都是支付大佬