AI助手支持GPT4.0
Loads custom CSS on WordPress Login Pages, Admin and Front-end via the admin interface.
通过管理界面在WordPress登录页面,管理和前端上加载自定义CSS。
Can be used with WordPress single install and WordPress multisites.
可以与WordPress单一安装和WordPress多站点一起使用。
Custom LAF CSS is very useful on multisite networks.
自定义LAF CSS在多站点网络上非常有用。
Admins can customize the look and feel of the network and add CSS for the entire network.
管理员可以自定义网络的外观,并为整个网络添加CSS。
Adding CSS to the front-end via this plugin is handy when common features need styling and you are not sure which theme the user will be activating.
当需要对常用功能进行样式设置并且您不确定用户将激活哪个主题时,可以通过此插件将CSS添加到前端很方便。
Main features:
主要功能: Loads custom CSS on Login, Admin and Front-end pages regardless of the active theme.无论活动主题如何,都在登录页面,管理页面和前端页面上加载自定义CSS。CSS for Login, Admin and Front-end is separately saved and used.用于登录,管理和前端的CSS分别保存和使用。 CSS is beautified and neatly presented in the admin. CSS被美化并在管理员中清晰地呈现。 CSS minification. CSS缩小。 Multisite compatible.多站点兼容。 Translation ready.已准备好翻译。Compatible with Admin CSS MU plugin with inbuilt feature to import CSS.与管理CSS MU 插件兼容,该插件具有用于导入CSS的内置功能。</ li>You can add your custom CSS in WordPress Admin > Appearance > Custom LAF CSS of your WordPress install or the base site on a WordPress multisite network.您可以在WordPress安装或WordPress多站点网络上的基础站点的 WordPress Admin>外观>定制LAF CSS 中添加自定义CSS。Upgrading From Admin CSS MU 从Admin CSS MU升级 Follow these steps if you are upgrading from the Admin CSS MU plugin.如果要从 Admin CSS MU 插件升级,请按照以下步骤操作。Install Custom LAF CSS plugin.安装自定义LAF CSS插件。Do not delete the Admin CSS MU plugin yet.请勿删除Admin CSS MU插件。 Go to the plugin page and in the ‘Admin CSS’ section, check the box that says ‘Import and append CSS from Admin CSS MU’.转到插件页面,然后在“管理CSS”部分中,选中“从管理CSS MU导入和附加CSS”框。Click ‘Save CSS’.点击“保存CSS”。Your CSS should be imported now.您的CSS应该立即导入。 Deactivate and delete the Admin CSS MU plugin.停用并删除Admin CSS MU插件。
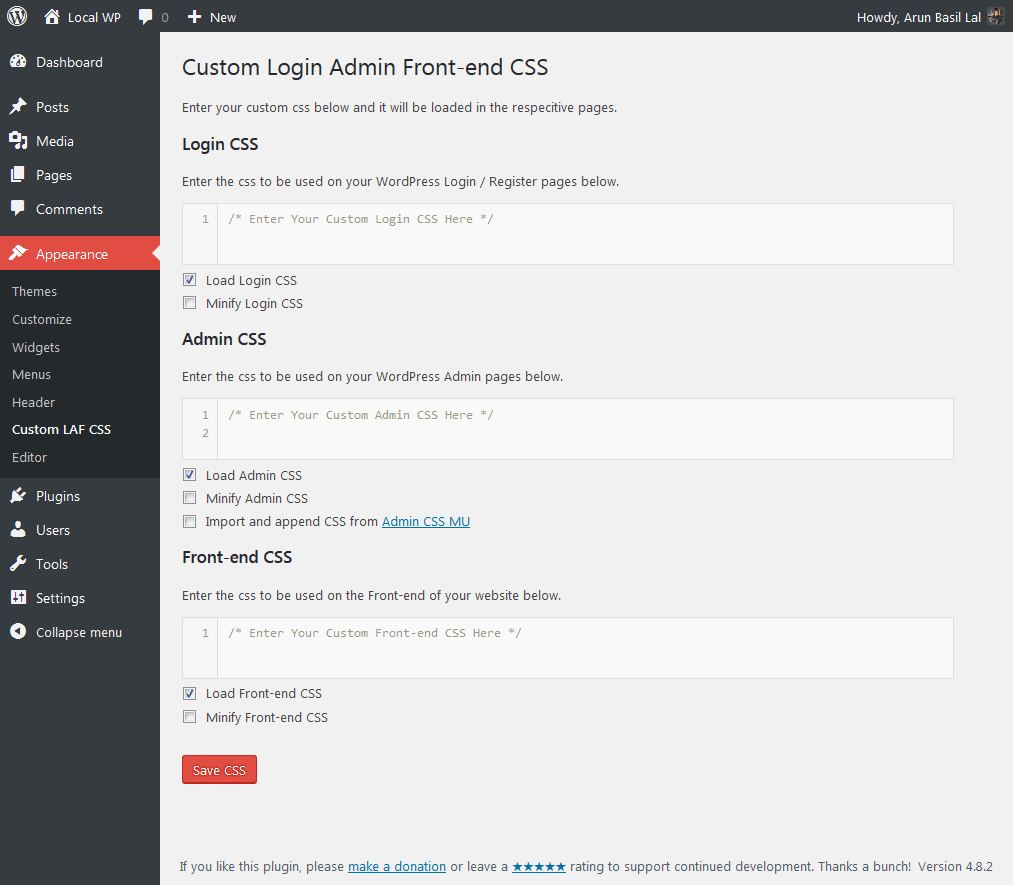
You can add your custom CSS in WordPress Admin > Appearance > Custom LAF CSS of your WordPress install or the base site on a WordPress multisite network.
您可以在WordPress安装或WordPress多站点网络上的基础站点的 WordPress Admin>外观>定制LAF CSS 中添加自定义CSS。Upgrading From Admin CSS MU 从Admin CSS MU升级 Follow these steps if you are upgrading from the Admin CSS MU plugin.如果要从 Admin CSS MU 插件升级,请按照以下步骤操作。Install Custom LAF CSS plugin.安装自定义LAF CSS插件。Do not delete the Admin CSS MU plugin yet.请勿删除Admin CSS MU插件。 Go to the plugin page and in the ‘Admin CSS’ section, check the box that says ‘Import and append CSS from Admin CSS MU’.转到插件页面,然后在“管理CSS”部分中,选中“从管理CSS MU导入和附加CSS”框。Click ‘Save CSS’.点击“保存CSS”。Your CSS should be imported now.您的CSS应该立即导入。 Deactivate and delete the Admin CSS MU plugin.停用并删除Admin CSS MU插件。
Upgrading From Admin CSS MU
从Admin CSS MU升级 Follow these steps if you are upgrading from the Admin CSS MU plugin.如果要从 Admin CSS MU 插件升级,请按照以下步骤操作。Install Custom LAF CSS plugin.安装自定义LAF CSS插件。Do not delete the Admin CSS MU plugin yet.请勿删除Admin CSS MU插件。 Go to the plugin page and in the ‘Admin CSS’ section, check the box that says ‘Import and append CSS from Admin CSS MU’.转到插件页面,然后在“管理CSS”部分中,选中“从管理CSS MU导入和附加CSS”框。Click ‘Save CSS’.点击“保存CSS”。Your CSS should be imported now.您的CSS应该立即导入。 Deactivate and delete the Admin CSS MU plugin.停用并删除Admin CSS MU插件。
Follow these steps if you are upgrading from the Admin CSS MU plugin.
如果要从 Admin CSS MU 插件升级,请按照以下步骤操作。
Do not delete the Admin CSS MU plugin yet.
请勿删除Admin CSS MU插件。
Your CSS should be imported now.
您的CSS应该立即导入。
For WordPress single install:
对于WordPress单一安装:
For Multisite:
对于多站点:
原文出处:http://www.sanshu.cn/a/9601.html
群主管理都是支付大佬