With Browser Caching you can tell Browsers when your files usually change, e.g.
使用浏览器缓存,您可以告诉浏览器文件通常何时更改,例如
every month, every week, etc. This will fasten up your website because Browser will only make requests to your Server after the declared time.
每个月,每个星期等。这将加快您的网站的速度,因为Browser仅在声明的时间之后向您的服务器发出请求。
PageSpeed is a Google Ranking Factor so it is important to have a fast website.
PageSpeed是Google的排名因素,因此拥有一个快速的网站非常重要。
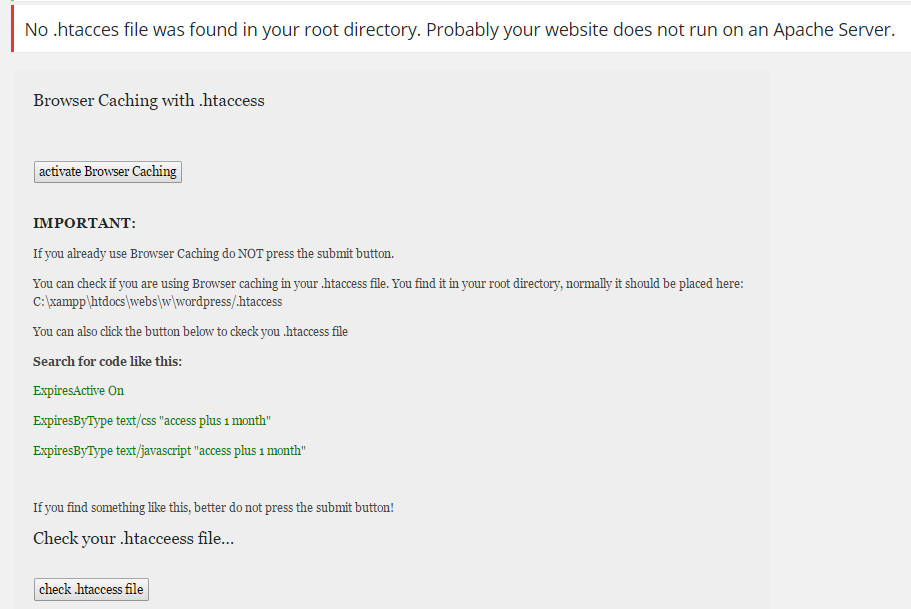
There a several ways to enable Browser Caching.
有几种启用浏览器缓存的方法。
This Plugin uses Expires.
该插件使用Expires。
The following code will be added to your .htaccess file:
以下代码将添加到您的.htaccess文件中:
ExpiresActive On
ExpiresActive On
ExpiresByType text/css “access plus 1 month”
ExpiresByType文本/ css“访问权限加1个月”
ExpiresByType text/javascript “access plus 1 month”
ExpiresByType文本/ javascript“访问权限加1个月”
ExpiresByType text/html “access plus 1 month”
ExpiresByType text / html“访问权限加上1个月”
ExpiresByType application/javascript “access plus 1 month”
ExpiresByType应用程序/ javascript“访问权限加1个月”
ExpiresByType application/x-javascript “access plus 1 month”
ExpiresByType应用程序/ x-javascript“访问权限加1个月”
ExpiresByType application/xhtml-xml “access plus 1 month”
ExpiresByType应用程序/ xhtml-xml“访问权限加1个月”
ExpiresByType image/gif “access plus 1 month”
ExpiresByType图片/ gif“访问权限加1个月”
ExpiresByType image/jpeg “access plus 1 month”
ExpiresByType图片/ jpeg“访问权限加1个月”
ExpiresByType image/png “access plus 1 month”
ExpiresByType image / png“访问权限加1个月”
ExpiresByType image/x-icon “access plus 1 month”
ExpiresByType图片/ x图标“访问权限加上1个月”
The second line means that css files will be requested after 1 month.
第二行表示1个月后将请求CSS文件。
The third line means that javascript files will be requested after 1 month and so on.
第三行表示将在1个月后请求javascript文件,依此类推。
Of course you can change the periods.
当然,您可以更改时间段。
You will find instructions for that in the FAQ section.
您可以在“常见问题解答”部分中找到相关说明。
In case you do not have reading rights to the .htaccess file you will get a 403 Permission Denied Error Page.
如果您没有对.htaccess文件的读取权限,则将获得403权限被拒绝错误页面。
So before activating this Plugin make sure you have reading rights to the .htaccess file (normally you have those rights).
因此,在激活此插件之前,请确保您具有.htaccess文件的读取权限(通常具有这些权限)。